6.8 Import and distribute certificates to devices
If you want to distribute certificates that have not been issued from a CA using MyID, you can import certificates in PFX files to MyID, then distribute them to your devices; for example, to your Identity Agent mobile identity.
6.8.1 Setting up the Unmanaged certificate authority
The Unmanaged entry in the Certificate Authorities workflow allows you to control the issuance of certificates uploaded from PFX files.
By default, a single active Unmanaged policy is provided, and an additional Unmanaged Imported policy is provided in a disabled state. If you are going to use both unmanaged policies, you must use the Certificate Authorities workflow to enable the second policy; you are also strongly recommended to rename the unmanaged policies to allow you to distinguish between them.
If you need more policies, you must add the appropriate entries to the MyID database. For more information, contact customer support, quoting reference SUP-229.
Note: When you are setting up the Unmanaged certificate authority, if you choose to renew any of the Unmanaged certificates automatically, you must supersede the policy with a different policy on a CA that is not the Unmanaged CA.
6.8.2 Setting up a credential profile for PFX certificates
In the Services section of the credential profile, you must select the MyID Encryption option so that MyID can issue the PFX securely; you can then select a certificate to use for encryption on the Select Certificates stage. If you do not select a certificate for encryption, MyID will generate a keypair for the credential to be used for encryption (the MyID Encryption Keys) instead of a certificate.
Note: If you do not select the MyID Encryption option, when you try to issue a card you will see an error similar to:
Failed to recover key from server
When you set up a credential profile, on the Select Certificates stage, select the unmanaged policies you want to use to issue certificates from PFX files. By default, there is a single active option, named Unmanaged.
Select one of the following options:
-
Use Existing – provide the user with the most recent active certificate.
This option will not transfer the certificate if it has expired, therefore issuance of the credential profile will fail. If no imported certificate exists, issuance of the credential profile will fail. The user must have a valid imported certificate to receive a credential with this setting.
If you select the Use Existing option, and you are using a data model with named containers, you must select an appropriate container for the certificate. If you do not want to place the certificate in a container, you must select Historic Only instead, and select the Default option for the container, which will place the certificate in one of the card's historic containers. You cannot select Use Existing and select the Default container.
-
Historic Only – select this option to allow certificates to be transferred without checking the expiry date, or where the user may not have an imported certificate.
This option may place the certificate in historic certificate containers on the device, depending on its capabilities; for example, devices that use a PIV Applet.
Note: You cannot select Issue new.
6.8.3 Uploading multiple PFX certificates
Each user can upload multiple PFX certificates to MyID, which will be recovered to that user's credential (for example, to Identity Agent) when an appropriately-configured credential profile is issued.
This is a self-service operation. An operator cannot upload PFX files on behalf of the user. You must make sure that the user has permissions to log into MyID, and their role has permissions to access the Upload PFX Certificates workflow.
To upload PFX certificates:
-
From the Certificates category, select Upload PFX Certificates.
Note: You can also launch this workflow from the self-service menu in the MyID Operator Client. See the Launching self-service workflows section in the MyID Operator Client guide for details.
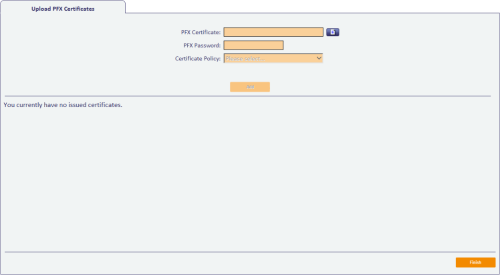
- Click the Browse for a PFX certificate button next to the PFX Certificate box, then select the PFX file you want to upload and click Open.
- Type the PFX Password.
-
From the Certificate Policy drop-down list, select the unmanaged certificate policy you want to associate with this PFX.
The list contains all enabled certificate policies that are currently assigned to the Unmanaged certificate authority. See section 6.8.1, Setting up the Unmanaged certificate authority for details.
-
Click Add.
The certificate is uploaded to the MyID database, and stored ready to be issued when you request it.

Note: If you attempt to upload a certificate you have previously uploaded to the same certificate policy, you are given a warning, and allowed to proceed or cancel the operation.

- Click Finish.


6.8.4 Removing uploaded certificates
To remove an uploaded certificate:
-
From the Certificates category, select Upload PFX Certificates.

-
Click the Delete this certificate
 option next to the certificate you want to delete.
Note: You cannot delete a certificate if it has been issued to a credential. Before you can delete the certificate, you must cancel all credentials to which it has been issued.
- Click Finish.
